This is the second in a series of blog posts which I am using to document and demonstrate the development of a real-world Aurelia web application. In this post I will describe setting up the development environment with Visual Studio 2017. Also check out Part 1: Introduction.
Create the Git repo and Visual Studio solution
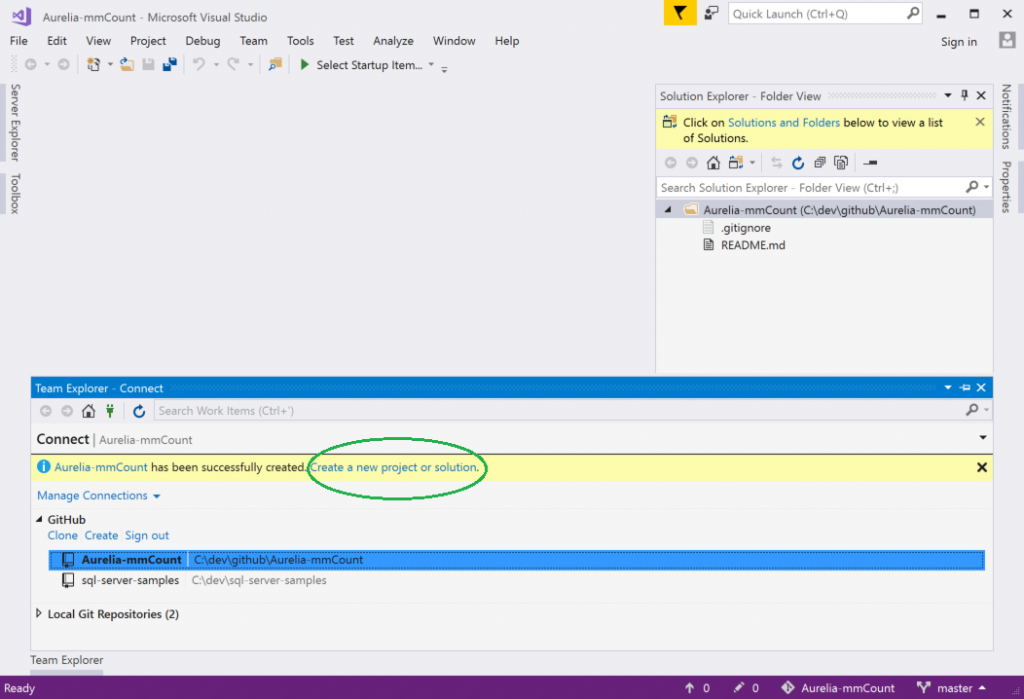
I like to use the GitHub Extension For Visual Studio so I am going to use it to create my git repo. It will automatically make the GitHub origin for me which is nice. After it’s created, the extension gives me a nice link to create a new project or solution.
 That’s what I need to do next so i’m going to click it.
As expected, it brought up the New Project dialog. I used it to create a new ASP.NET Core Web Application. The next window gives you the opportunity to chose what type of project template you want to use: Empty, Web API, or Web Application. The latter two have authentication options as well. I am going to use the Web API template with no authentication. I don’t need authentication because I am going to implement it myself with Auth0 and I don’t need all the MVC View stuff that the Web Application template provides.
Set up Aurelia
Aurelia provides several “starter kits” if you want to use JSPM/System.js or WebPack. It also has a great CLI tool which is what I am going to use. Open up a command prompt and go to the directory where Visual Studio just created the project. The Aurelia CLI requires nodejs. I usually use the latest LTS version but you need to use at least version 4.x. I strongly suggest that you use this node version manager if you’re on Windows: https://github.com/coreybutler/nvm-windows. In the command prompt, install the Aurelia CLI globally:
npm install aurelia-cli -g
Once it’s installed we need to use it to create our project. This is the command that I’ll use to do that.
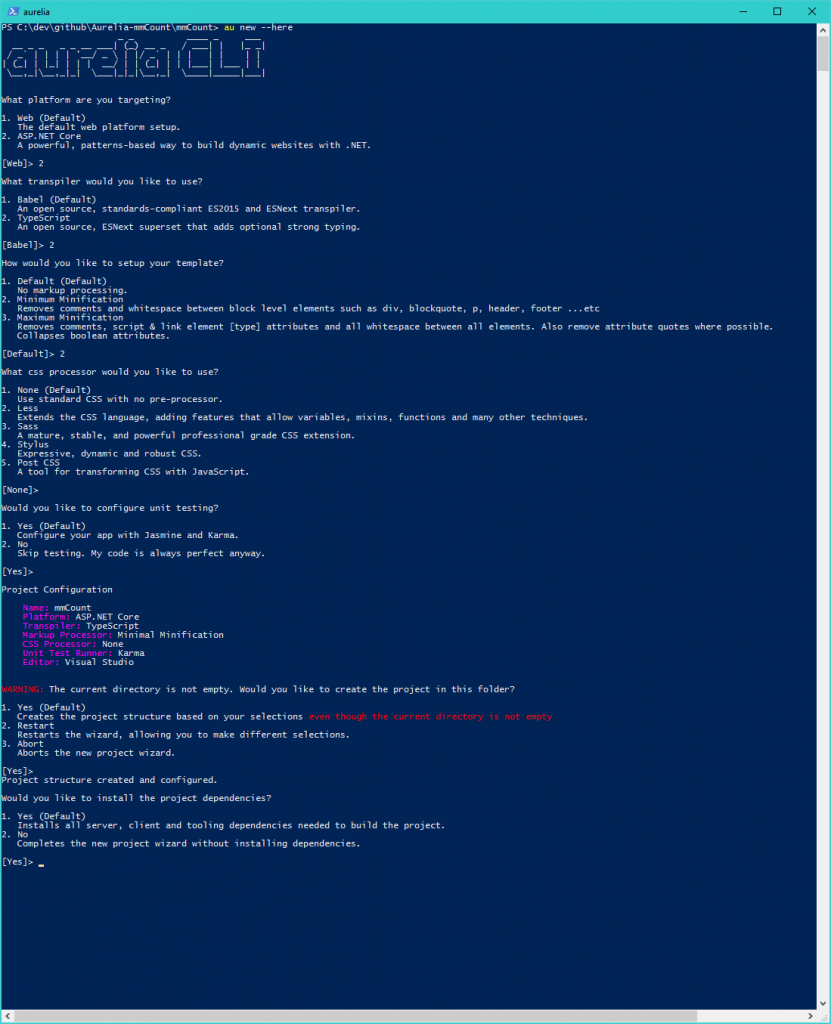
au new --here
the --here flag tells it to create the project in this existing folder. If you leave that flag out, it will ask you what you want to name your project and create a folder for you. This command will ask you a bunch of questions that you must answer. This is how I did it:

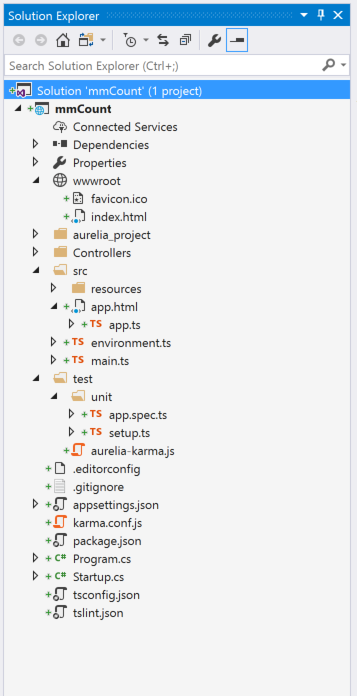
Tell it yes to install all the dependencies at the end. It will take a few minutes to do all that. When it is done it leaves you with a few remarks and you are back at the command prompt. Let’s go back to Visual Studio and see what happened. There are a lot of new things in the Solution Explorer now:

- In the wwwroot folder it added index.html. This is the html document that will be loaded by the browser and host our Aurelia application. It has all the startup stuff that Aurelia needs to get going. You will hardly ever need to edit it. When the Aurelia CLI builds your project that output goes in this folder as well.
- The aurelia_project folder contains a bunch of configuration and utilities that are used by the Aurelia CLI for this specific application. With the exception of one file, you probably won’t ever need to make any changes here. The nice thing about this is that you can tweak the way the CLI works for just this project and it won’t affect other projects.
- The src folder is where you will write your actual code for the app. HTML, CSS and TypeScript will all go here. It starts with a few default files that you need to get the app going.
- app.html and app.ts are the template and code for the root component of your application.
- main.ts is what bootstraps and initializes your application.
- environment.ts is a config file. The values it exports can be transformed by the CLI depending on the target environment that you want to release to (dev, stage, prod, etc).
- The test folder is where you will write all your tests. It starts you off with a test for src/app.ts. We’ll talk about testing in another post.
At this point we can run the app that it just created. In the command line:
au run --watch
Now I can open up a browser and point it to http://localhost:9000/ to verify that my new Aurelia app is running. Whenever that command is run the Aurelia CLI will compile and bundle all the resources and copy them to an output folder. These files will get loaded into the browser by the Aurelia bootstrapper. The CLI will then start up a development web server that will host the web app. The --watch flag tells the Aurelia CLI to watch for changes in any of your code files. When it sees a change it will run the build again and then refresh the browser. I can test this by going to Visual Studio and editing the value for the message field in app.ts. A few moments after I save the file, I can see the change in the browser and I didn’t even have to refresh it.
Visual Studio
One of the things I really like about developing with Visual Studio it that it groups similarly named files together in the Solution Explorer. This keeps my templates and code together and makes it easy to find things. You can see how app.ts hangs under app.html in the tree view.
There is one thing that Visual Studio is doing that I don’t want it to be doing: It is automatically compiling my TypeScript files for me and putting the resulting .js files next to them. Since the Aurelia CLI is handling that for me, I don’t need VS to do it. It’s not a problem, it just pollutes the Solution Explorer (and git repo) with a bunch of files I don’t need in there that don’t even get used by the app. That’s easily fixed by editing the mmCount.csproj file and adding this property to it:
 <PropertyGroup>
   <TypeScriptCompileBlocked>True</TypeScriptCompileBlocked>
 </PropertyGroup>
It can go anywhere in the <Project> node. VS has already generated the .js files but there are only a few so it’s easy enough to delete them manually.
A front-end and a back-end
At this point there is fact that it’s important to be aware of: we have 2 separate apps in our one project. One of the apps is the ASP.NET Core app that is hosted by Kestrel and IIS Express. The other is the Aurelia app which gets served by the Aurelia dev server and executed in the browser. In development it’s great to have these two things separate because I can develop, test and debug each one separately.
I do need those two apps to communicate, though so I’ll take care of that which will wrap up this exercise of setting up the development environment. What I want to do is get the message that I display in the browser to come from the server.
The ASP.NET Core app
I need an API action to get the message from. That’s easy enough. In Visual Studio, I’ll edit ValuesController.cs and in the Get() method, I’ll change the return type to string and make it return the message I want to show in the browser. That looks like this:
public string Get()
{
  return $"Hello! The current time is {DateTime.Now.ToString("T")}";
}
Because the Aurelia client and Web API are two separate apps they are running on two separate ports. As such, I need to set up CORS so that the client can call the server. That’s easy enough, I’ll just add this line of code to the Configure() method of the Startup class:
app.UseCors(p => p.AllowAnyOrigin());
It goes just before the app.UseMvc(); line. Now I can compile the code and verify that it works. Ctrl+F5 with the default Visual Studio keyboard bindings will build and then run the app in the default browser.
The Aurelia app
Now I can call that API from my Aurelia app and assign the value to the message field. In Aurelia, bits of UI logic are called components and components have a lifecycle. Aurelia wants you to do certain things at certain points of that lifecycle with functions that you create in your code called lifecycle hooks. We’ll talk more about components’ lifecycles later. We’ll implement our functionality in the ‘activate’ lifecycle hook of the App TypeScript class.
The first thing I need to do is install an HTTP client. Since this is not necessary for every app, it is not installed by default. Because Aurelia is modular, I can use any HTTP client that I want but I’m going to use the one that Aurelia provides. In the command prompt to install it:
npm install aurelia-http-client --save
After the package is installed I need to let Aurelia know about it so that the bundler can include it and it will be sent to the browser. This is a little bit annoying because you have to manually edit a file but on the other hand, it’s a cool feature that you get so much control over the bundler and indeed the whole CLI. Open the file /aurelia_project/aurelia.json. There’s a lot going on in there. Go to the build.bundles property and find the item with name:"vendor-bundle.js". In that item there is a dependencies property. Add the value "aurelia-http-client" to that array.
Now I can use it to call the API to get the message. In app.ts import the http client so that it is available in the file. This goes at the top of the file:
import { HttpClient } from 'aurelia-http-client';
To implement a lifecycle hook, all you do is create a function on your class with the same name as the lifecycle hook. That looks like this:
activate() {
  var client = new HttpClient();
  return client.get('http://localhost:53537/api/values').then(r => {
  this.message = r.response;
  });
}
If you are following along, the URL you use in get() will probably use a different port. You can just copy it from the browser window when you tested the API action method earlier. When I save the file I can now see the message display in the browser.
Here’s what’s happening in the activate() function. The get() function of the HttpClient instance returns a Promise. The result of that Promise is an HttpResult object which has a lot of information including the text for the message which is on the response field. I assign the value of that response field to the message field of the class. Notice that the function returns the value from client.get(). Because it is a Promise, Aurelia will pause the lifecycle until the Promise resolves. This is a great feature that gives us the ability to control how the application transitions from one state to another. We’ll see more about this later.
All Done
So that’s it! The dev environment is set up and now I can start implementing the features of my app.
If you want to follow along, here is the git repo: https://github.com/matthewcv/Aurelia-mmCount/tree/master/mmCount. There is a tag called ‘blog-part-2’ that you can checkout to see the state of the code at the end of this post.
Up next: Upgrading Stuff.
